As the movie Dodgeball taught us, “If you can dodge a wrench, you can dodge a ball!” To some extent, the same logic can apply to squatting: if you can do a kettlebell goblet squat, you can do ANY kind of squat (or at least you’ll be able to learn much faster). The kettlebell goblet squat teaches sound movement mechanics for squatting, allowing you to work your legs without excess stress on your lower back or knees. It’s a foundational movement for anyone who likes to train with kettlebells, or who ultimately wants to train heavy back squats, front squats, power cleans, or a range of other more advanced movements.
Key Takeaways
– The kettlebell goblet squat is often used to teach good squat technique, as it helps you to keep an upright torso and sit back with your hips.
– The goblet squat trains the core and upper back in addition to the lower body.
– If you have trouble doing the kettlebell goblet squat, a landmine squat could be a more effective alternative. Adding a curl at the bottom of the movement, or doing it as more of a lunge pattern at a 45-degree angle may help too.
We’ll start by showing you how to execute the kettlebell goblet squat with great form, tell you all the muscles it works and how, and then provide some alternative exercises you can use to become a sound and strong squatter.
Let the game begin!
How To Perform The Kettlebell Goblet Squat
(See 02:00 in the video.)
Step 1. Hold a kettlebell in front of your chest by the sides of its handle. Draw your shoulders back and downward (think: “proud chest”), and tuck your elbows in close to the bell—try to get your forearms as vertical as you can. Stand with your feet between hip- and shoulder-width apart, and turn your toes out a bit—up to 30 degrees if you need to.
Step 2. Tuck your tailbone and draw your ribs down so that your pelvis is parallel to the floor. Take a deep breath into your belly, and brace your core. Actively twist your feet into the floor, but don’t let them move. Think of your legs as screwdrivers, or that you’re standing on grass and trying to twist it up beneath you. You should feel the arches in your feet rise and your glutes tighten, creating tension in the lower body.
Step 3. Keeping a long spine from your head to your pelvis, push your hips back and squat down, as if sitting down into a chair. Squat as low as you can while keeping your head, spine, and pelvis aligned. Push your knees apart as you descend. You should feel most of your weight on your heels to mid-foot area. If you feel your lower back beginning to round, stop there, and come back up. Keep your torso as vertical as possible—you shouldn’t have to lean forward or work extra hard to hold the bell upright. Avoid bending or twisting to either side.
Step 4. Drive through your feet as you extend your hips and knees to come up.
Benefits of the Kettlebell Goblet Squat
(See 01:00 in the video above.)
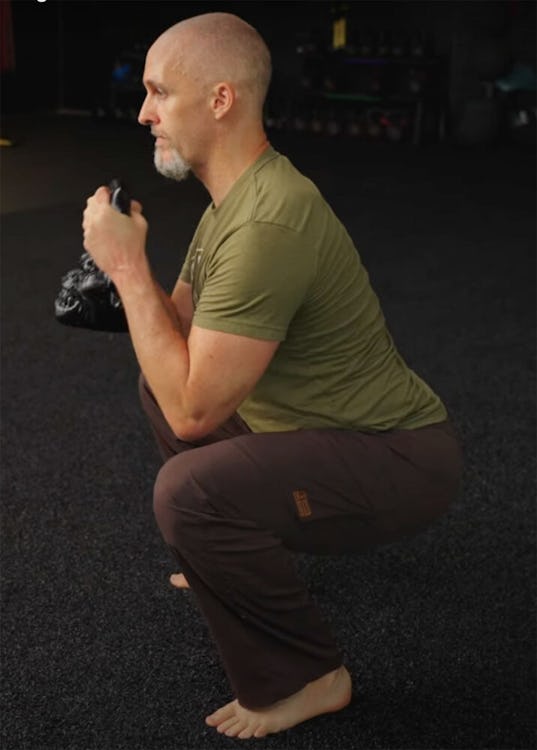
First and foremost, the goblet squat is an excellent teaching tool for learning the classic squatting movement pattern correctly. When most people begin squatting, whether with their bodyweight or a barbell on their back, they have trouble sitting back on the descent and activating the muscles of their hips. They tend to lean forward excessively to maintain balance, and that can lead to a range of problems: squatting too shallow, rounding the lower back, letting the knees collapse inward, allowing the heels to rise off the floor, etc.
In the goblet squat, you hold a load in front of your body, and it acts as a counterbalance. As a result, you’ll feel more comfortable opening your hips and sitting back with them—you don’t feel like you’re going to fall backward when you begin the descent, because the weight of the kettlebell is gently pulling you forward. This allows you to squat deeply with an upright torso, and that makes it possible to activate the greatest amount of muscle throughout your legs, while minimizing shear forces on the spine. As you descend, your elbows naturally travel inside your knees, which is a reminder to push your knees out to make room for the elbows. Doing so helps your knees to align with your toes, and that prevents the knee pain so often associated with knees that collapse inward.
Positioning the kettlebell in front of the torso makes your core brace your spine more or less automatically, so you can argue that the goblet squat builds strong abs as well. Furthermore, holding the weight in front of the chest asks a lot of the shoulder and upper back muscles, and fighting to maintain good shoulder alignment strengthens your posture. This can pay big dividends if you go on to train more challenging types of squats, such as the back squat and front squat. It can also help make you stronger at presses and pullups/rows too.
Due to the vertical torso position, the goblet squat is much easier on the lower back than a back squat is. If you recently injured your low back doing back squats, or just can’t get the hang of them, the goblet squat is a great squat variation to regress to in order to clean up your form. In this regard, it has a lot in common with the front squat, and goblet squats are often used to build up to training front squats. With the lighter loads used, however, the goblet squat is more user-friendly and easier to master.
Because the goblet squat is relatively easy to master, it works well in circuits and other fast-paced workouts that train the whole body. You can pick up a kettlebell, knock out a set, and move on to the next thing. Only the most advanced athletes or lifters could be as efficient with back squats and other barbell variations, so it’s no wonder why the goblet squat is popular in exercise classes and for home-gym training.
Muscles Used In the Kettlebell Goblet Squat
The kettlebell goblet squat is really a full-body exercise, but it’s treated mainly as a lower-body lift. Here are the muscles it recruits, from the top down.
Upper back (traps, rhomboids)
Deltoids
Lats
Wrist flexors and extensors
Rectus abdominis, and deep core muscles
Spinal erectors
Quadriceps
Glutes
Calves
While the goblet squat does work a lot of muscle, it’s not a great choice for someone looking to make big muscle gains—at least not long-term. It will certainly help to improve your squat technique and strengthen your back, legs, and core, but as you progress your loading on the goblet squat, you will reach a point where your upper body can’t support the weight anymore, while your legs still feel strong. At this stage, it’s wise to advance to front squats or back squats, which will let you go heavy enough to ensure that your quads gets trained to the fullest.
However, that isn’t to say that goblet squats can’t be done with heavy weight, especially if kettlebells or dumbbells are all you have to train with. Some lifters have done reps with well over 100 pounds, which makes for an impressive test of overall body strength. But the difficulty and awkwardness of getting such heavy weight into position makes moving on to a different type of squat a more practical progression.
How To Stretch Before Doing The Kettlebell Goblet Squat
(See 07:39 in the video.)
The kettlebell goblet squat is as beginner-friendly a squat as there is, but it still requires mobility in some key muscle groups to perform correctly. You can loosen up your ankles, hips, and quads beforehand with these drills from Shane Heins, Onnit’s Director of Fitness Education. Perform one round of each movement below in sequence. Do reps of each move for 30 seconds, and then repeat for 3 total rounds.
Ankle Roll On Edges of Feet
Step 1. Stand with feet about shoulder-width apart and place your hands on your knees. Begin circling your knees outward (left knee counter-clockwise; right knee clockwise) while rolling on the outer edges of your feet. Raise your heels as your knees come forward, and move slowly and smoothly.
Step 2. Perform your reps in one direction, and then repeat in the opposite direction. If you have trouble keeping your balance, hold onto a sturdy object for support.
Bent-Knee Hip Circle
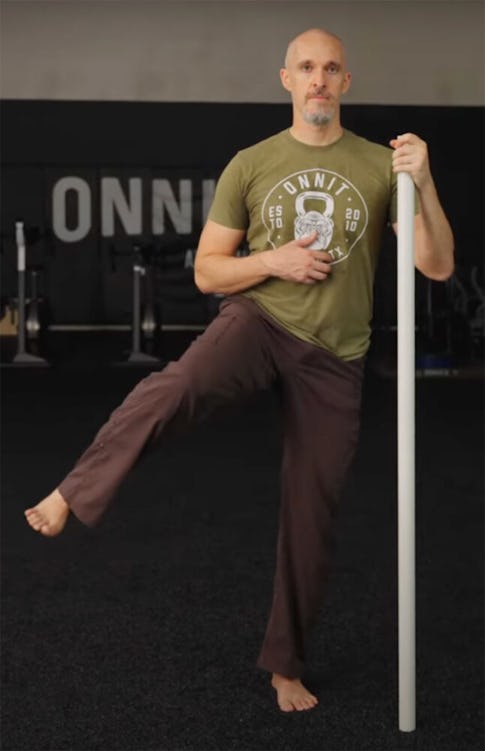
Step 1. Hold onto a sturdy object for support. Tuck your tailbone under and draw your ribs down, so that your pelvis is level with the floor, and brace your core. Raise one leg in the air in front of you with your knee bent. Allow a soft bend in the leg that’s supporting you.
Step 2. Rotate your leg 90 degrees out to your side, and then begin turning your toes toward the floor as you draw the leg behind your body. Return your foot to the floor. That’s one hip circle.
Step 3. After 30 seconds, switch legs.
Kneeling Hip Extension
Step 1. Kneel on the floor in a tall position—shoulders and hips stacked over your knees. Your toes can be pointed into the floor. Place your hands on your ribs and pelvis and draw your ribs down so that the two areas pull closer together. Your pelvis should be level with the floor. Brace your core, and squeeze your glutes.
Step 2. Keeping a long spine, begin leaning back slowly, so that you feel tension in your quads. Go as low as you can control, and then extend your knees to kneel tall again. Over time, work to lower yourself a little further.
Kettlebell Goblet Squat Variations
(See 13:09 in the video.)
If you have a tough time maintaining an upright torso while you squat, or your squat lacks depth, try the 45-degree goblet squat, which uses more of a lunge pattern to stretch out your hips and train a tall posture.
45-Degree Goblet Squat
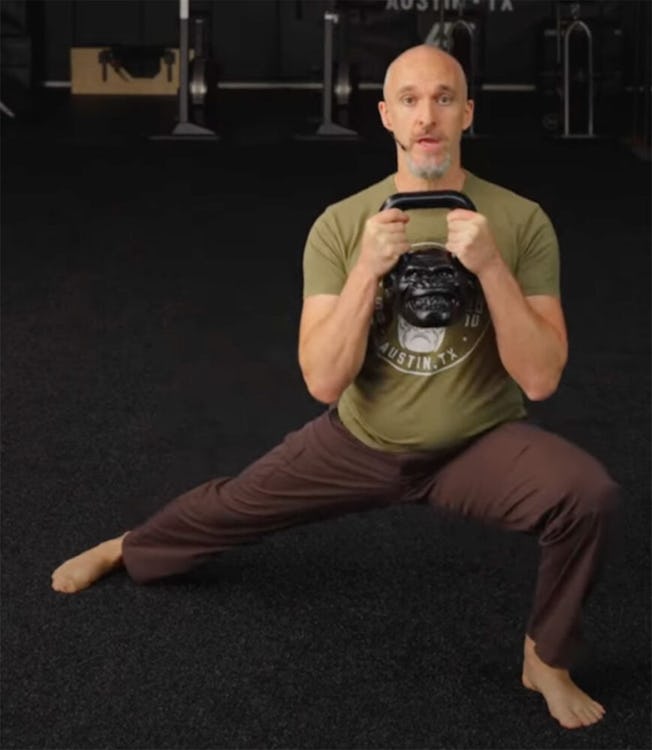
Step 1. Hold the kettlebell in the goblet squat position and place one leg 45 degrees out and behind you, as if stepping back into a deep lunge.
Step 2. Squat, driving your front knee over the center of your foot and lowering your body as far as you can. Complete your reps and repeat on the opposite side. Aim for 3 sets of 5 on each leg. Then test out your goblet squat and see if it feels better.
Kettlebell Goblet Squat With Curl
This movement helps you get more comfortable in the bottom position of the squat. At the bottom, you extend your arms in front of you and then curl the weight back up. No, it won’t build your biceps, but it will get you more time in that deep squat position so you can focus on keeping your torso upright, your knees out, and your pelvis neutral.
Step 1. Set up as you did to perform the regular kettlebell goblet squat.
Step 2. Squat down. When you’re as low as you can safely go, hold the position. Extend your elbows, lowering the weight until it’s just above the floor.
Step 3. Curl the kettlebell back up to your chest, and come back up out of the squat. That’s one rep. Do 3 sets of 5 reps.
Kettlebell Goblet Squat Alternatives
(See 16:35 in the video.)
If you don’t have a kettlebell, a barbell and plates will allow you to get a similar effect to the goblet squat, and offer some other advantages as well.
While the goblet squat is ideal for beginners, some people will find that they still have trouble keeping their torso upright while performing it. In this case, using a barbell in a landmine unit can be a great solution. With a landmine squat, the load is held in front of the body the same as it is with a goblet squat, but the bar is anchored to the ground and travels on an arc. This all but guarantees that you’ll stay tall while you squat, because if you bend too far forward, the bar will poke you in the chest.
Step 1. Load one end of a barbell into the cylinder of a landmine. (If you don’t have a landmine, the corner of a room can suffice; just protect the walls with a towel.) Hold the opposite end of the bar with both hands and stand in your squat stance. Twist your feet into the floor to create tension in the lower body as described in the goblet squat directions above.
Step 2. Lower into the squat as deeply as you can, and then extend your hips and knees to come back up.


