
The Pendlay row is a variant of the barbell bent-over row exercise that builds muscle and strength throughout the entire back. It’s a favorite of competitive weightlifters and can help anyone build a back like a barn door and lift hundreds of pounds. Keep reading (and see the video below) for instructions on how to do the Pendlay row, troubleshoot any form problems you may have, and see how and where to fit this exercise into your workouts for better results.
Key Takeaways:
1. The Pendlay row is a bent-over row where you let the bar settle on the floor for a moment at the bottom of each rep.
2. The Pendlay row builds starting strength, and develops the lats and upper back.
3. Make sure you keep your hips and torso in the same position throughout the whole set.
4. The Pendlay row can be done first in your workout or as an assistance lift after deadlifts or cleans.
What Is A Pendlay Row and What Are Its Benefits?
(See 00:21 in the video above.)
The Pendlay row looks something like a deadlift, but is executed more like a bent-over row. The bar is on the floor, you bend your hips back to reach it, row, and then return the bar to the floor each rep. Because you have to reset the bar on the floor, your lower back gets a bit of a break, at least compared to doing the basic bent-over row, where you hold the flexed-hip position throughout the set and lower the bar to arm’s length. This reset also allows you to lift heavier weights, which makes the Pendlay row a great strength exercise for the lats, upper and lower back, core, and grip.
The Pendlay row is named for the late weightlifting coach Glenn Pendlay, who unwittingly invented the exercise in an effort to get his students to train bent-over rows more efficiently and with stricter form. It also carries over well to developing the explosive back strength needed for weightlifting and powerlifting movements such as the clean, snatch, and deadlift.
How to Perform Proper Technique For The Pendlay Row
(See 01:07 in the video.)
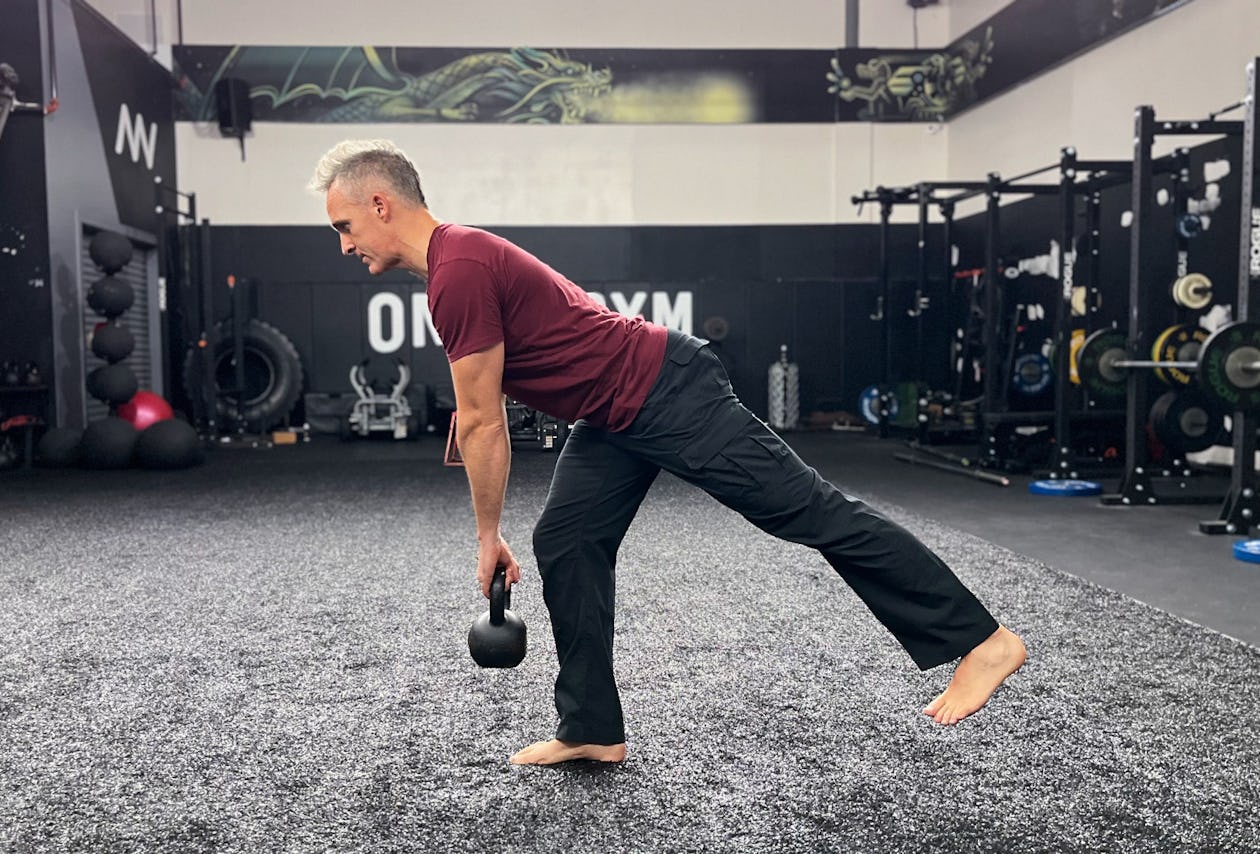
Step 1. Set up as you would to deadlift, placing your feet at about hip-width and just behind the barbell on the floor. Keeping a long spine from your head to your tailbone, bend your hips back as far as you can, and bend your knees until you can reach the barbell with your hands about shoulder-width apart or a little wider. Your hips should be bent about 90 degrees so that your torso is parallel to the floor, and you must maintain this angle throughout the set.
Step 2. Draw your shoulders back and down, as if pushing your chest out and closer to the bar beneath you. You should feel your lat muscles contract. Now brace your core. Your neck should be neutral, with your eyes focused on the floor in front of you.
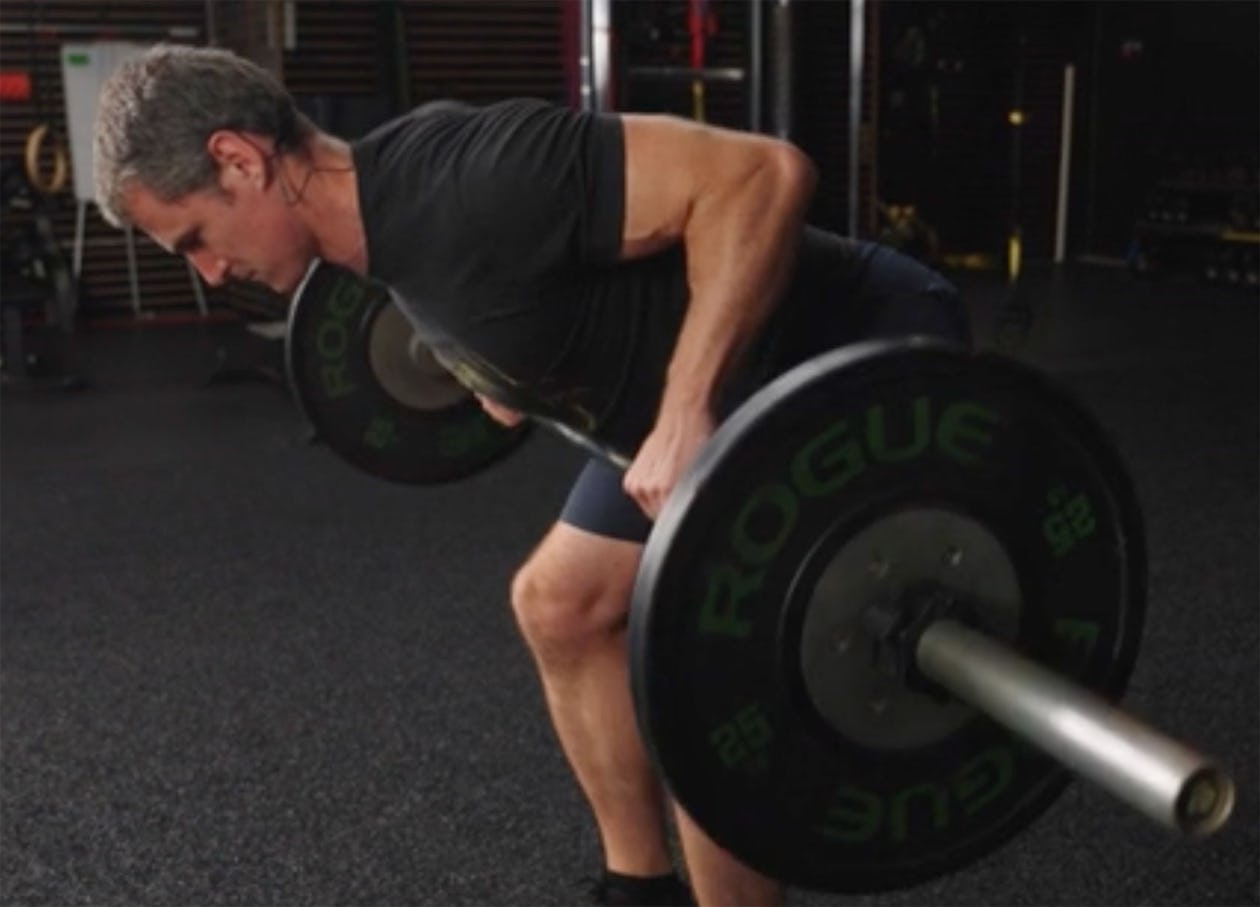
Step 3. Keeping the rest of your body as still as possible, row the bar—explosively—to the bottom of your chest/upper abs. Remember to maintain your hip position so your lower back stays neutral and flat.

Step 4. Lower the bar quickly, but under control, until it touches the floor again. Take a moment to reset the bar (especially if it wobbles), and begin your next rep.
Make sure the bar touches down in the same place it started. It’s OK to let the bar come down fairly quickly, as the movement is supposed to be explosive with an emphasis on the concentric (upward phase of the lift), but for the sake of safety and control don’t just let it drop.
The Pendlay row works well when programmed for lower reps, with sets of 5–8 reps being the sweet spot.
Muscles Worked In The Pendlay Row
(See 02:26 in the video.)
The key players here are:
– Lats (drawing the arms back)
– Rhomboids (retracting the shoulders)
– Rear deltoids (pulling the arms back)
– Lower and mid traps (retracting the shoulder blades)
– Spinal erectors (stabilizing your spine in the bent-over position)
– Biceps (bending the elbows)
– Core (the various ab muscles brace your spine)
Common Mistakes and How to Avoid Them
(See 02:50 in the video.)
#1. Changing torso and hip position.
Coach Pendlay offered his version of the row to correct a problem he often saw in others rowing: raising the torso. A set might start off strict, but as the lifter tires, he/she tends to bounce the upper body, heaving the weight up with more of the low back than is necessary and pulling the weight to the stomach (thereby cutting off the range of motion).
In a proper Pendlay row, you must keep your hips bent 90 degrees and your torso locked in place. Only the shoulders and arms move.
#2. Rounding the spine
In any bent-over exercise where the chest is unsupported, there’s a greater demand on your trunk to stabilize the torso and spine. Rounding the back is the enemy here, and it invites the risk of lower-back injury. Remember to think “long spine” and keep your lower back in its natural arch. As you bend over into position, think about trying to touch your butt to the wall behind you, as opposed to folding over at the waist.
#3. Not letting the weight touch the floor between reps.
If you don’t touch the weight down between reps, you’re just doing a bent-over row. At the same time, if you bounce the weight off the floor too quickly, you’re likely to break form. The whole value of the Pendlay row comes from beginning each rep from a dead stop. By eliminating momentum, you develop more of what coaches call “starting strength”—the ability to get the weight moving. Relying on momentum to keep the bar in motion is a way to cut corners and miss out on the full benefit.
If you have trouble disciplining yourself to reset between reps, try counting to two after you touch the bar down and before you begin the next rep. Treat each rep like its own set.
#4. Pulling the bar to the wrong place.
Rowing the bar too high or too low on the torso can throw off the target muscles being used. For example, pulling the bar up toward the collarbone can end up working the arms and upper traps a bit more than the upper and mid back. Alternatively, pulling the bar to the waist can reduce the activation of the upper back.
Note the proximity of your body to the bar in your setup. Lining up the bar so it’s just over your shoelaces is a good starting point. Once you bend over the bar to pick it up, aim for your shoulder blades to be in line with the bar—not your deltoids or belly button. This will encourage you to pull in a straight line.
Pendlay Row Exercise Variations
(See 04:47 in the video.)
The Pendlay row can be customized for your needs and goals with a few simple tweaks.
Elevated Pendlay Row
If you’re especially tall, or lack the hip mobility to reach the bar when it’s on the floor without rounding your lower back, it’s OK to do a Pendlay row with the bar elevated on some blocks, mats, or weight plates. This will shorten the range of motion some so you can focus on rowing without worry about the safety of your spine position. An elevation of anywhere from 3 to 12 inches can be a game-changer.
Paused Pendlay Row
For variety, you can add an isometric hold at the top of each rep. That is, a pause when the bar is pulled to your chest. Most people have a habit of bouncing the bar off their chests, and the top of the rep is the weakest biomechanical position in the movement. Therefore, it’s a good idea to force yourself to hold the weight there from time to time, and it will not only strengthen your row but also help to clean up your form.
Pauses are also a good strategy to use if you’re injured or don’t have access to much weight. Taking an extra second or two to hold the top position with your back fully contracted will make lighter weight feel much heavier, and see that you get the best training effect from the weights you have access to or can handle.
Alternatives To The Pendlay Row
(See 06:15 in the video.)
Fisherman Row
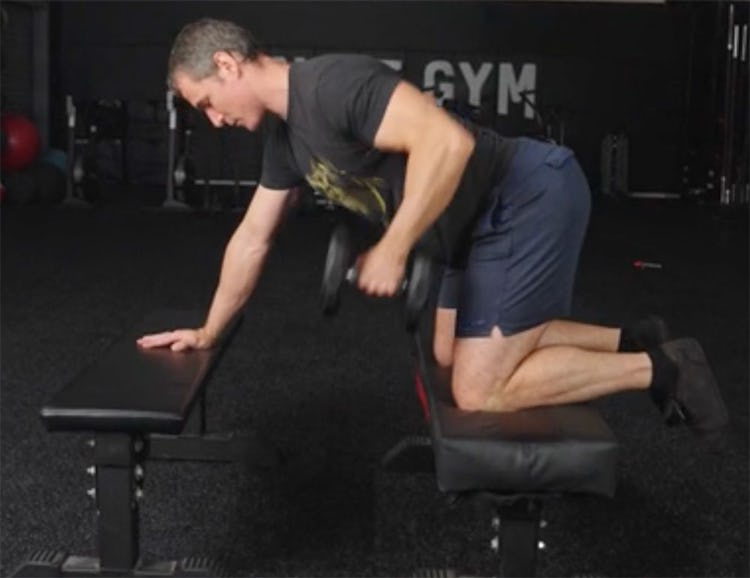
While the Pendlay row requires only a barbell and plates, you may work out at home with just a bench and dumbbells. In this case, you might consider doing a single-arm dumbbell row variation. A fisherman row is a dumbbell row done with two benches. This creates a lot of stability and helps you keep your hips square to the floor, which encourages a long, straight spine.
Step 1. Place two benches parallel to each other, and rest a dumbbell on the floor in between them. (If you don’t have two benches, use a step or box to substitute for one.)
Step 2. Place your knees on one bench, shoulder-width apart. Rest one hand on the bench in front of you, and grasp the dumbbell with the other. Your hips should be square to the floor.
Step 3. Row the dumbbell to your side, straight up from the floor. Return it to the floor, pause, and repeat.
Using a dumbbell also allows you to train the row through a slightly greater range of motion, as well as utilize a higher rep range than would be practical with the barbell version.
Inverted Row
The inverted row is ideal for home workouts or anyplace else you have very limited equipment. In this case, you’re moving your own bodyweight and not a barbell, although you can set it up with a barbell on a power rack, or a suspension training system like a TRX or gymnastics rings. The inverted row spares the lower back and enables the lifter to pause at the top and/or bottom of each rep.
Step 1. Set the bar or suspension handles to around waist height, and hang from the handles with your feet on the floor. Extend your hips and position yourself so that you’re suspended above the floor and your body forms a straight line. Draw your shoulders back and down to engage the lats.
Step 2. Pull your body up to the bar or handles, and lower yourself back under control. It’s important that your body moves as a unit. That means no hiking the hips or bending the knees to help yourself out.
How To Warm Up For Pendlay Rows
(See 07:50 in the video.)
Hip Hinge
Step 1. Stand with feet parallel and bend your knees slightly.
Step 2. Now drive your hips back as far as you can while keeping a long spine from your head to your tailbone. When you feel a stretch in your hamstrings, or you can’t push your hips back any further without losing your spine position, come back up to standing. Do 2–3 sets of 5–15 reps.
Cat Camel
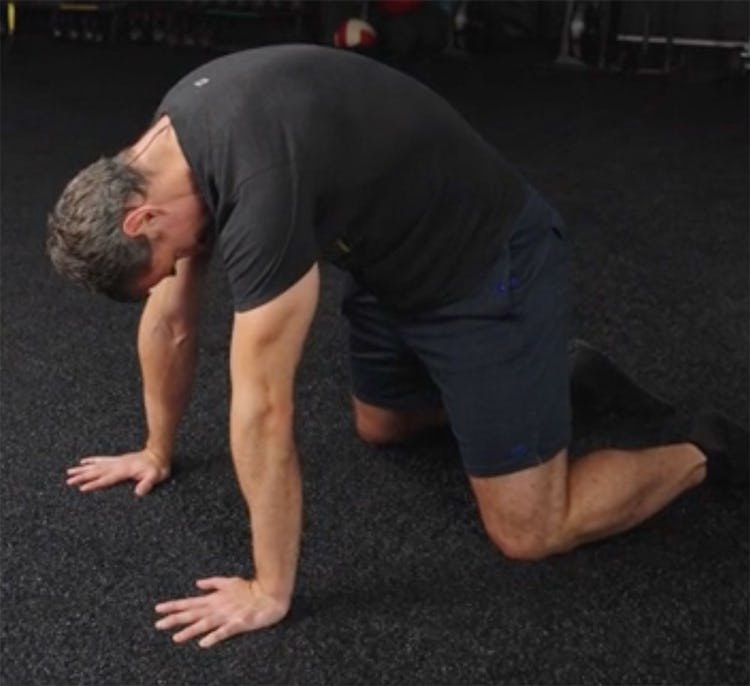
Step 1. Get on all fours and brace your core. Your arms should be directly under your shoulders and your knees under your hips.
Step 2. Press your arms into the floor while you round your upper back toward the ceiling, spreading your shoulder blades. Hold for a second.
Step 3. Now retract your shoulder blades while you arch your upper back and drive your solar plexus toward the floor. Hold for a second. That’s one rep. Imagine the motion as having a string running through your solar plexus with someone pulling it up and then down—try to move at the upper back and not the lower back. Do 3 sets of 10 reps.
Who Should Perform the Pendlay Row?
(See 09:48 in the video.)
Lifters who want a break from the conventional barbell row, as well as those whose lower backs bother them, may have an easier time doing the Pendlay row. Resting the bar between reps can be a saving grace for the lumbar region. Pendlay rows are also a great way to check your form and ensure your torso stays in the correct position, so you could consider them a good pre-requisite to master before returning to regular bent-over rows.
They’re also a perfect accessory lift done after deadlifts, cleans, snatches, or other movements that some lifters compete in. The Pendlay row trains you to keep your hips and torso braced while you pull explosively—a huge component to all of the aforementioned lifts.
Additionally, any lifter who wants to build a strong back from the base of the neck down to their sacrum can benefit from working on the Pendlay row from time to time, especially if they train at home or in a gym where equipment is sparse.
Differences Between the Pendlay Row and Other Rows
(See 10:36 in the video.)
As we explained above, letting the bar settle on the ground is a key difference between the Pendlay row and the conventional bent-over row. Resting momentarily between reps gives the lower back and core muscles a break. Plus, having to explode the weight up from a dead-stop position builds power that can translate to weightlifting and other sports. It also lets you train heavier than a bent-over row and make it a more strength-focused movement.
Both Pendlay and bent-over rows require plenty of trunk stability, and that sets both movements apart from machine and chest-supported rows, which allow you to isolate the lat and upper-back muscles more completely. Subsequently, supported rows are probably better overall choices for pure muscle gains, while Pendlay and bent-over rows are, arguably, more functional movements that involve the whole body and build strength that more readily applies to other lifts and real-life activities.
The T-bar row, in which you straddle the barbell while one end is fixed against the floor, is another barbell-based rowing movement. The T-bar setup allows you to stand more upright and is a little easier on the lower back than both the Pendlay and bent-over row, and also lets you go heavier than these lifts, but it doesn’t offer the full-body challenge of the Pendlay or bent row.
Choose the row that’s most appropriate for your goals, and feel free to experiment with each variation over time. For instance, people who are interested in greater strength and power for weightlifting or powerlifting competition may choose to make Pendlay and bent-over rows their mainstay, while muscle-seekers may opt for chest-supported or T-bar rows. Furthermore, if you’re dealing with a back injury, Pendlay rows are a better choice than bent-overs, and chest-supported rows would probably be better still.
How to Fit Pendlay Rows Into Your Workout
(See 12:15 in the video.)
The Pendlay row is a demanding lift that offers the potential to move a lot of weight. For those reasons, it will ask a lot of the nervous system and grip strength of the lifter. Placing the Pendlay closer to the beginning of your back (or pull day) workout would be a smart choice to maximize the amount of weight lifted and the stimulus (it can also come second in line behind deadlifts, if you do those on pull day).
Performing Pendlays later in your workout will mean you’ll have to go lighter and may not get as much out of them, but it’s a good strategy if you want to use less weight so as not to aggravate a back injury or cheat form.
In general, it’s good to keep the reps on the lower end (5–8). You can complement Pendlays with other lower-back intensive lifts done for higher reps (10 and above), like the back extension, good morning, and bird dog.